
- How to access microphone settings on a laptop
- How to turn off or turn on the microphone on a laptop
- How to choose the default microphone
- How to turn on the sound output from the microphone to the speakers
- How to increase the volume of the microphone on a laptop
- How to turn on noise reduction on the microphone
- How to change the sample rate and bit setting
- Microphone setup
- We configure an external microphone
- We remove the noise when working with a microphone
- Check the presence of a microphone
- We adjusted the built-in microphone
- We adjust the microphone in Skype
- Support
- Selection
- Instruction
- Options
- Conclusion
- Enable integrated microphone
- Device setup
- Enable and configure portable device
- How to remove noise?
Built-in microphone and webcam is now on any modern. Because of this, after buying a laptop, many users who have not previously dealt with a microphone ask how to set up a microphone on a laptop. If you are also interested in this issue, then we suggest that you read our article.
How to access microphone settings on a laptop
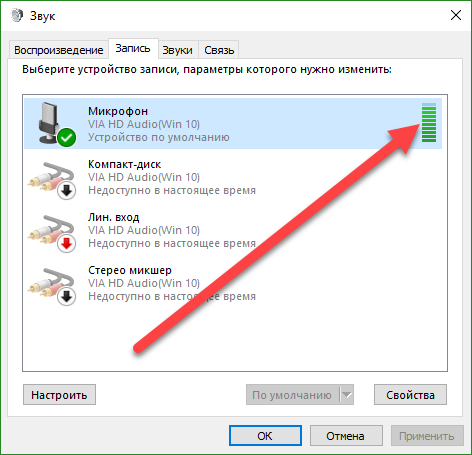
In order for a laptop, you must first open the window with its settings. To do this, right-click on the speaker icon on the taskbar and in the opened window select the Recorders item.
In addition, access to the microphone settings on a laptop can be obtained through the "Taskbar". To do this, go to the section "Equipment and Sound - Sound." After the “Sound” window appears on the screen, you will only need to go to the “Recording” tab.

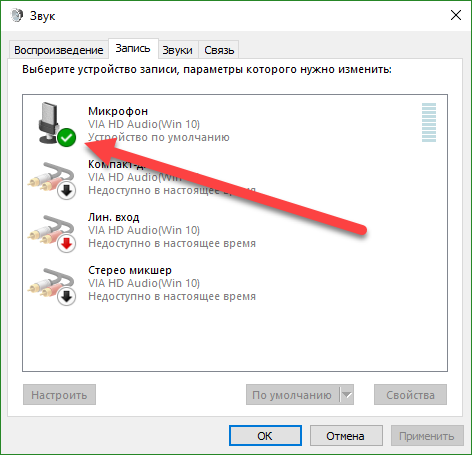
As a result of the above actions, you should see the “Sound” window open on the “Recording” tab. Using this window you can change the basic settings of your microphone.
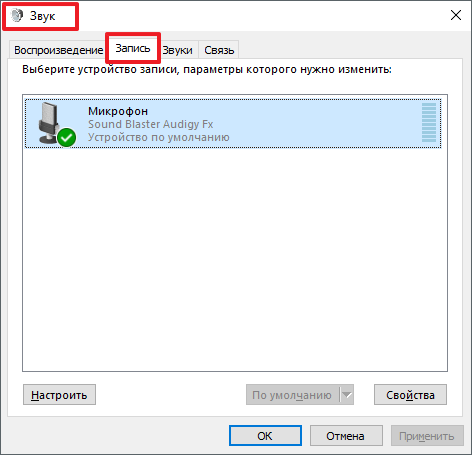
Below we describe what can be changed on a laptop using this window.
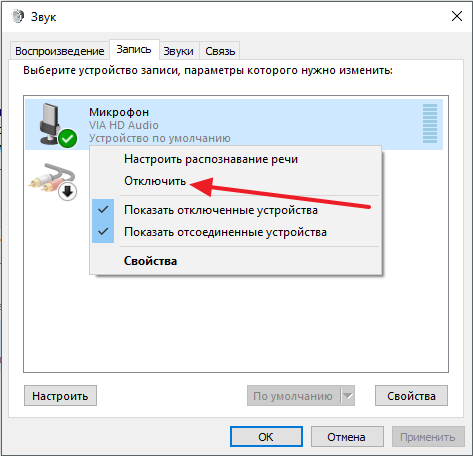
How to turn off or turn on the microphone on a laptop
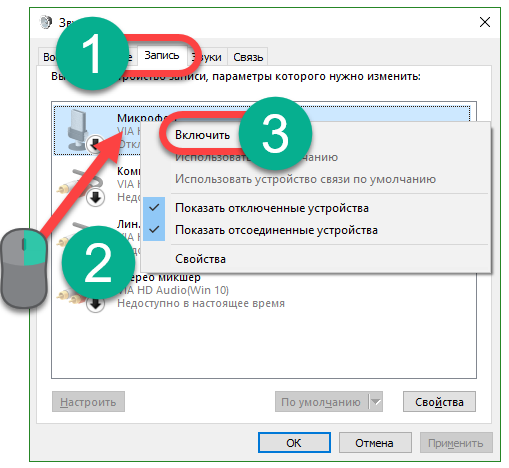
The first and easiest thing to do in the “Sound” window is to enable or. In order to access this setting, you need to right-click on the icon of your microphone and select the appropriate item in the menu that appears.
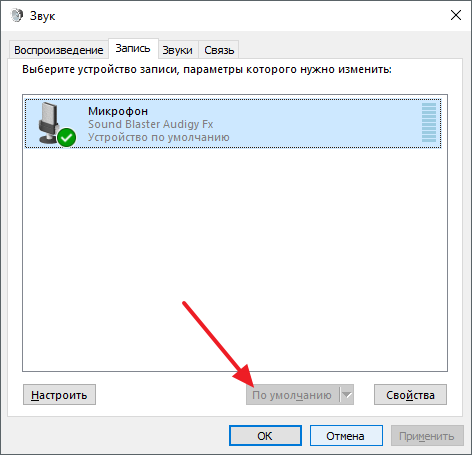
How to choose the default microphone
Also here you can specify which microphone should be used by default. This setting will be useful if several microphones are connected to your computer at once.
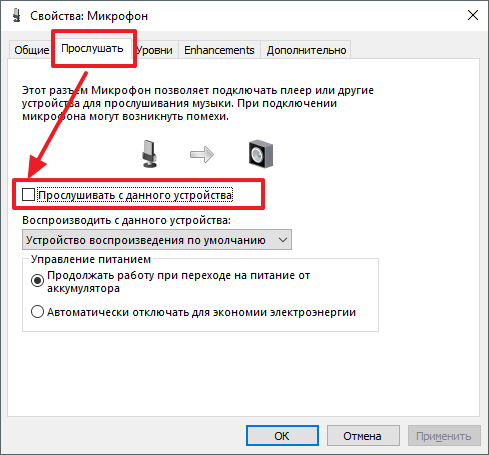
How to turn on the sound output from the microphone to the speakers
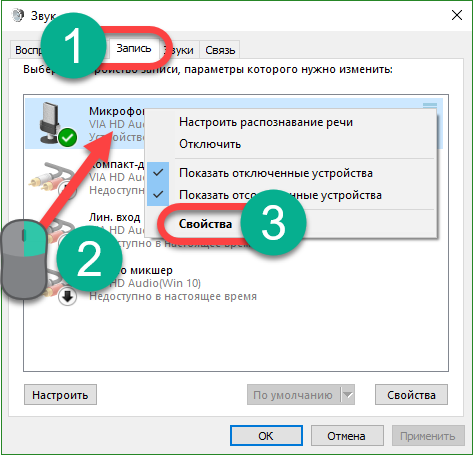
In order to enable sound output from the microphone to the speakers, as well as to access the rest on the laptop, you need to select the microphone and click on the "Properties" button.
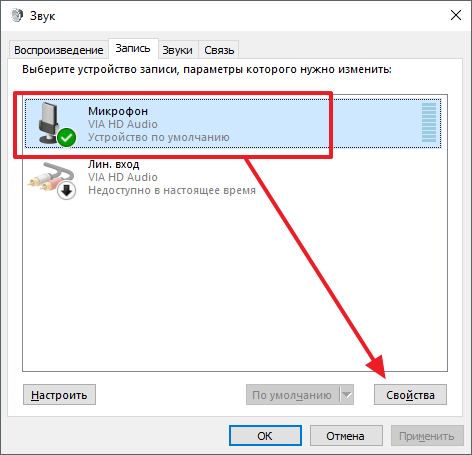
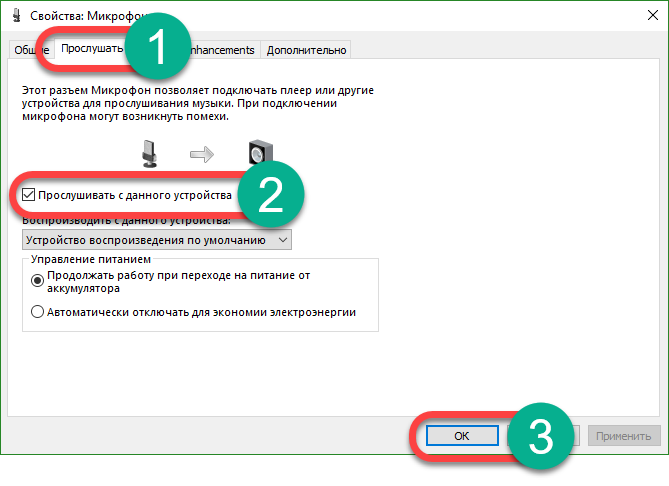
This will open the “Microphone Properties” window. Here you need to go to the “Listen” tab and enable the “Listen from this device” function there.
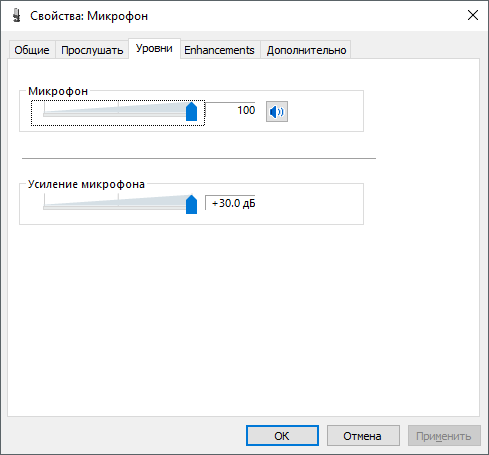
How to increase the volume of the microphone on a laptop
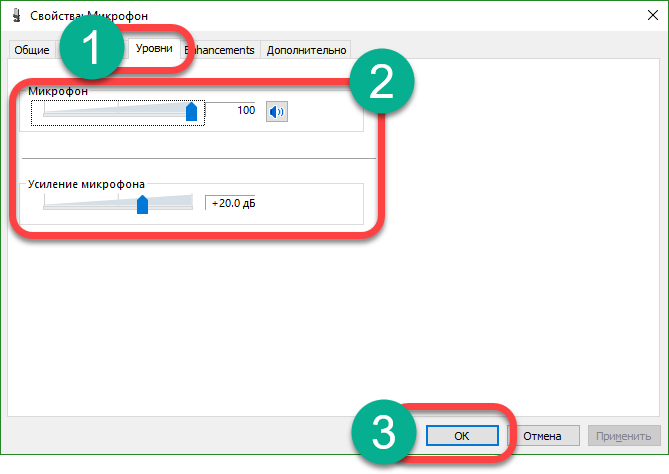
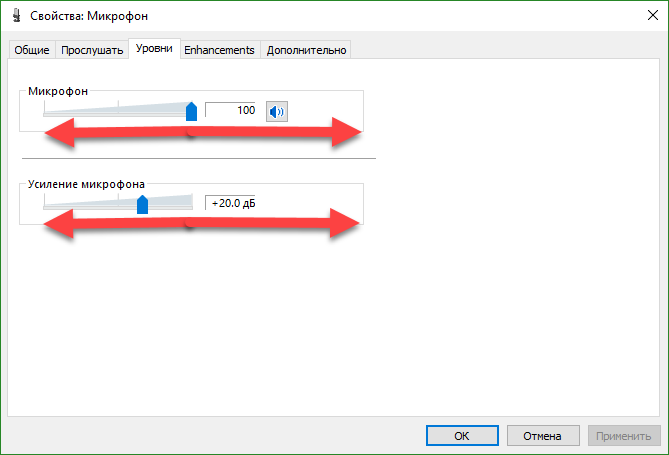
In order for a laptop, in the “Microphone Properties” window, go to the “Levels” tab. There will be two functions available: “Microphone” and “Microphone Boost”. Increasing the value of these functions, you can increase the volume of the microphone on your laptop.
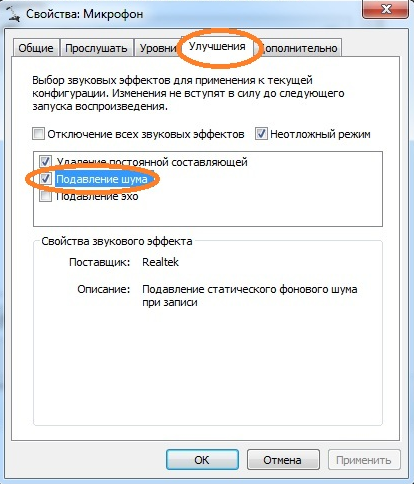
How to turn on noise reduction on the microphone
In order to enable microphone noise reduction, as well as other sound enhancements, in the microphone properties, go to the Enhancements tab. It should be noted that these functions are not always present in this tab. Their availability depends on which one is used on your laptop.
How to change the sample rate and bit setting
If necessary, you can change the settings for the sample rate and bit depth for your microphone. This can be done in the properties of the microphone on the Advanced tab.
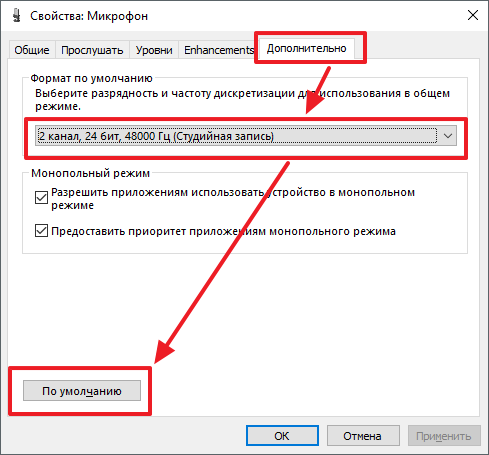
If installed settings the sampling rate and bit depth did not suit you; you can return the default values by clicking on the “Default” button.
Fix audio recording problems or connect new microphone in the latest operating system from Microsoft is very simple. This is done using the standard functionality of the system; there is no need to use additional software. In this article we will take a closer look at how to configure the microphone on Windows 10 as a detailed step by step instructions . Each stage will be accompanied by screenshots for clarity.
If your computer or laptop has an integrated sound sensor, but for some reason it does not work, you may just need to turn it on. In order to do this, take the following steps.
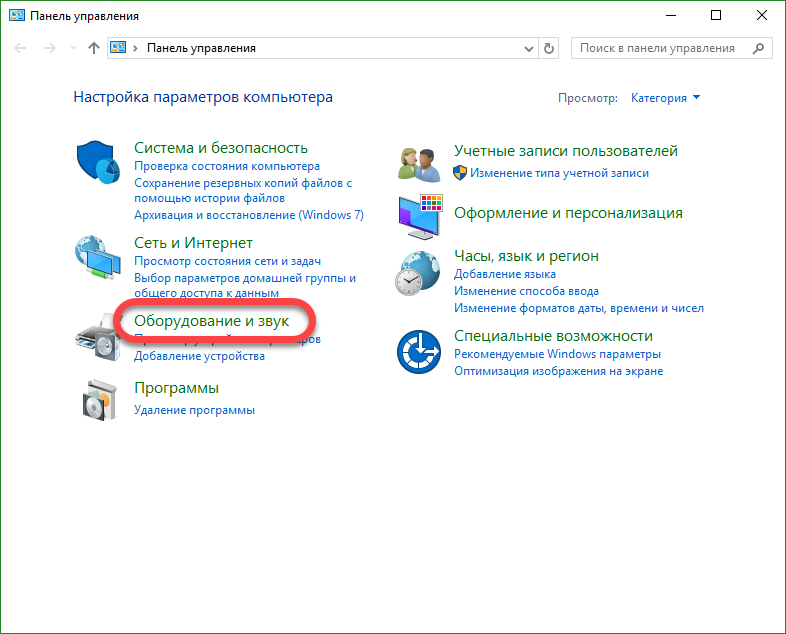
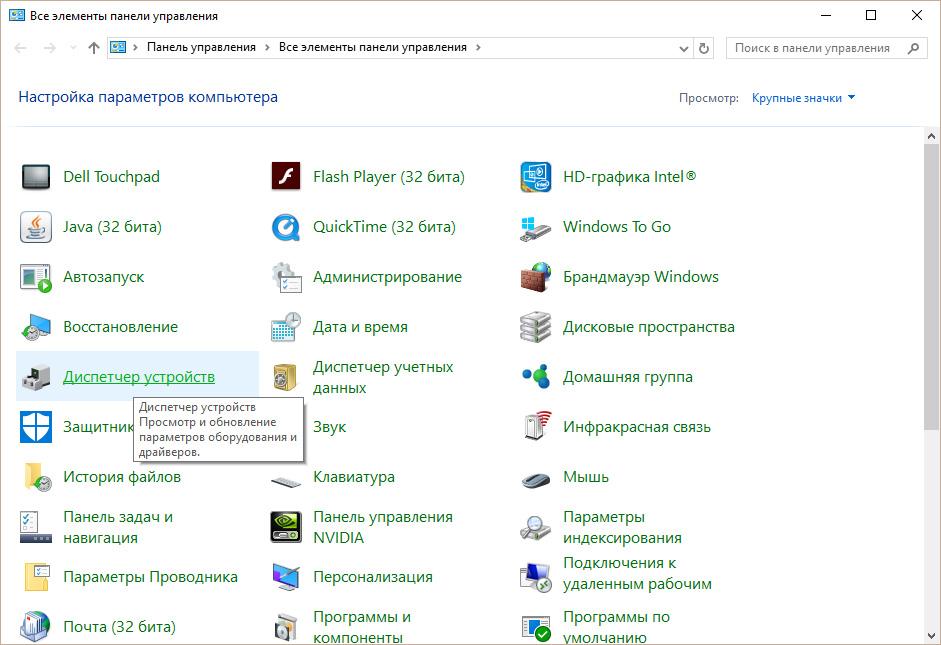
- Run the control panel. For this we will use the universal Windows search Click on the magnifying glass icon located in the lower left part of the taskbar and enter the required query in the search field. Next, click on the result.
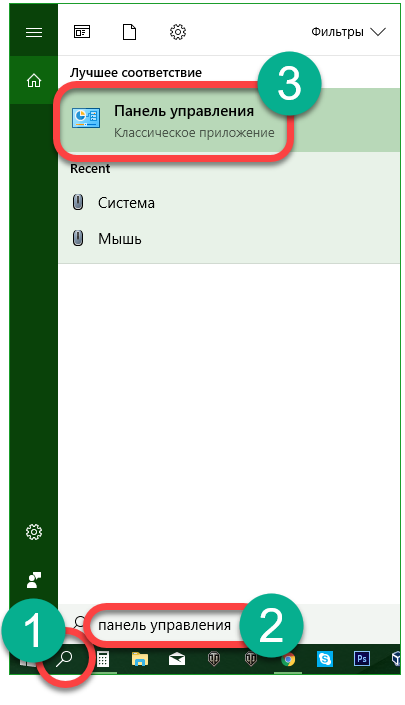
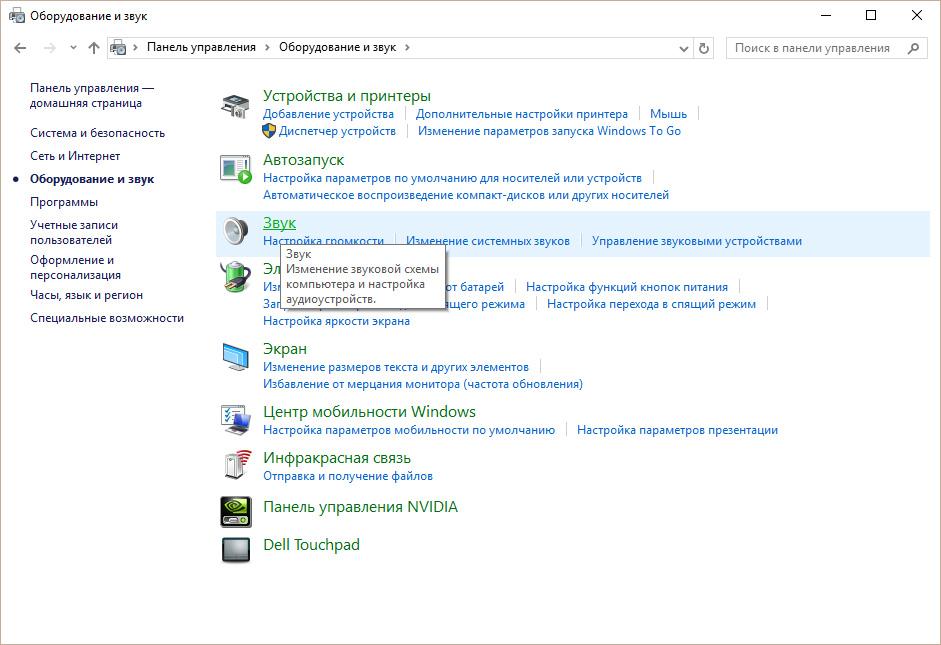
- Click on the inscription: "Equipment and sound."
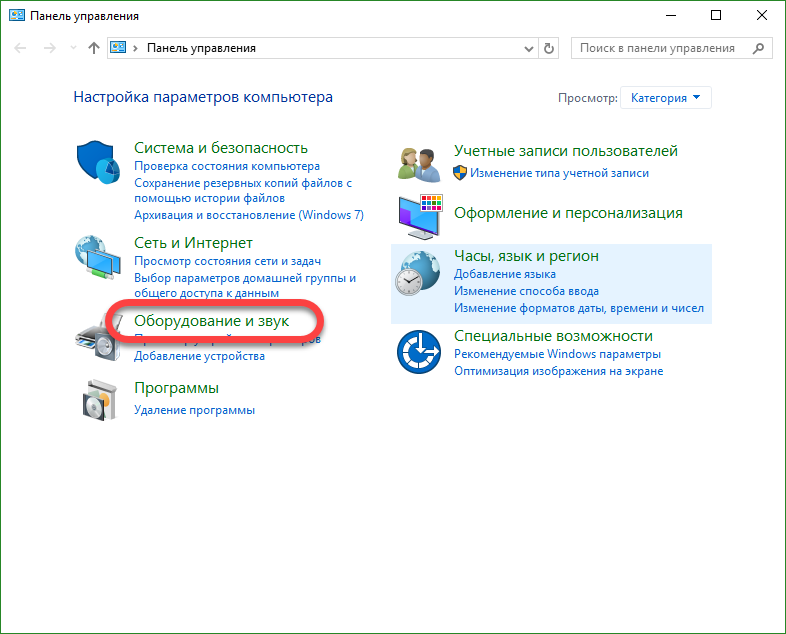
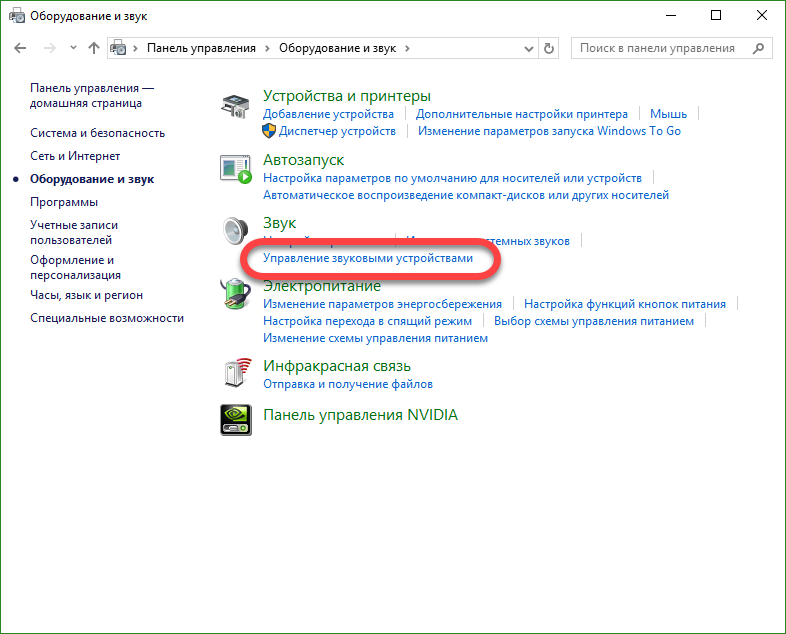
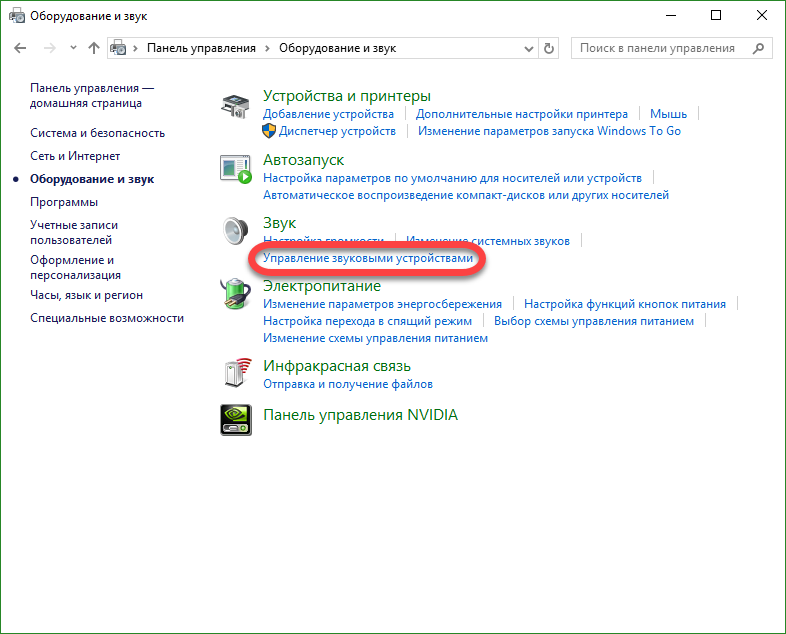
- In the next window, select the section "Control sound devices."
In the same menu can be accessed in another way.
- Right-click on the speaker icon in the system tray and select the “Sounds” item.
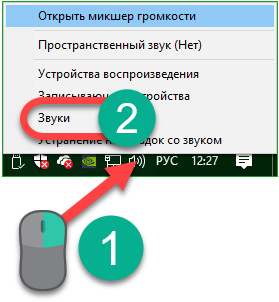
- Go to the "Record" tab, and right-click on our microphone, we need the "Enable" item. You can also turn off the device.
- We click with the right key of our manipulator on the microphone and select the “Properties” item in the context menu.
- We need the "Levels" tab. Use the two sliders to adjust the sensitivity in the best way possible.

- Also, when setting up the device, you can turn on pre-listening (you will hear what you say into the microphone through the PC speaker system). In order to do this, go to the “Listen” tab and set the checkbox marked “2” in the screenshot into active position. To apply the changes, click "OK".
After that, the microphone will be turned on and will start working. The device can be used for any purpose, for example, Skype.
Microphone setup
First you need to check if there is a sound driver in the system.
Do the following:
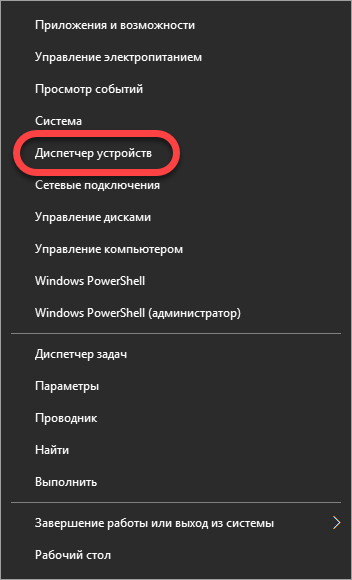
- Start the device manager. To do this, right-click on the "Start" button and select the appropriate item.
- Expand the line with the name “Audio inputs and audio outputs”, then right-click on the desired device and select “Properties”.
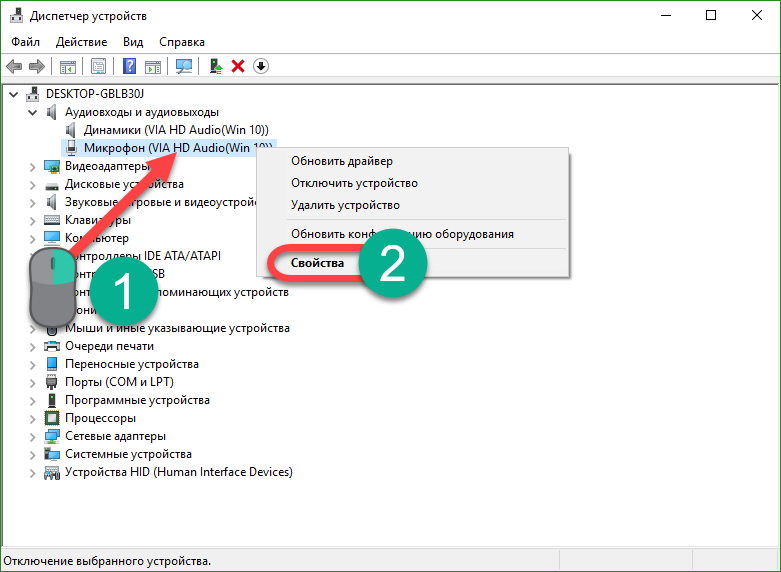
- Go to the “Driver” tab and look at the information specified in it. As you can see, we have a driver from Via HD Audio installed, therefore, everything is in order.
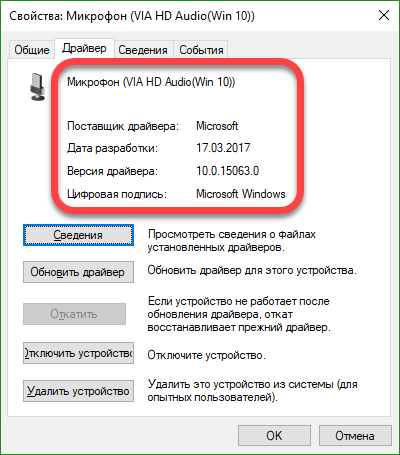
If you do not have a description of the driver, and a yellow question mark is lit in front of the microphone in the device manager or an unknown device is displayed at all, you need to install the driver. Initially find out the version of the hardware, and already for it, look for the driver itself.
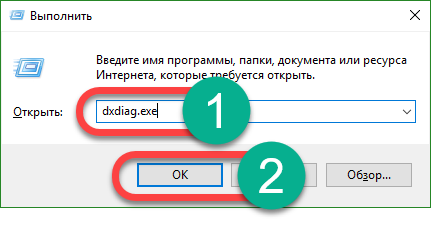
In order to find out the version of the sound card, press the Win + R hot key combination and enter the dxdiag.exe command in the opened window, then click OK.
Go to the “Sound” tab. Here you can find out the version of your equipment. Use it to search for the driver on the official website of the manufacturer. Download driver for microphone is better from there. When the program is loaded, install it and restart the computer.
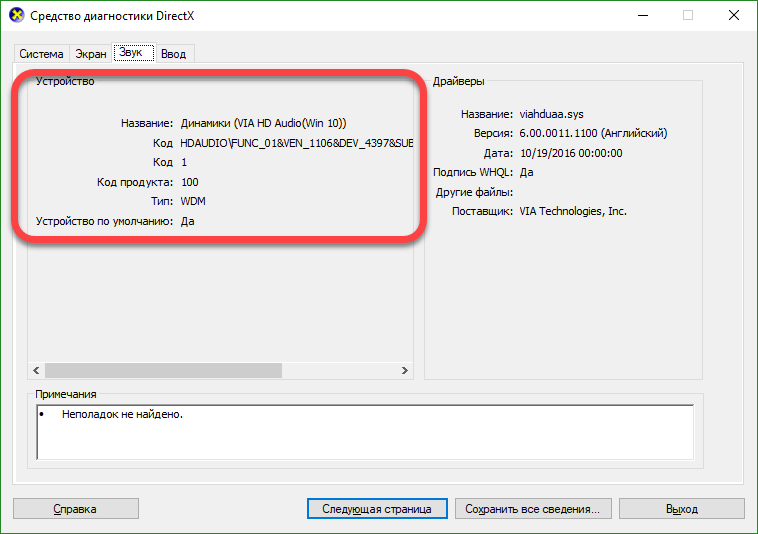
If everything goes well, a green circle will appear in front of the microphone in the audio properties of Windows 10.
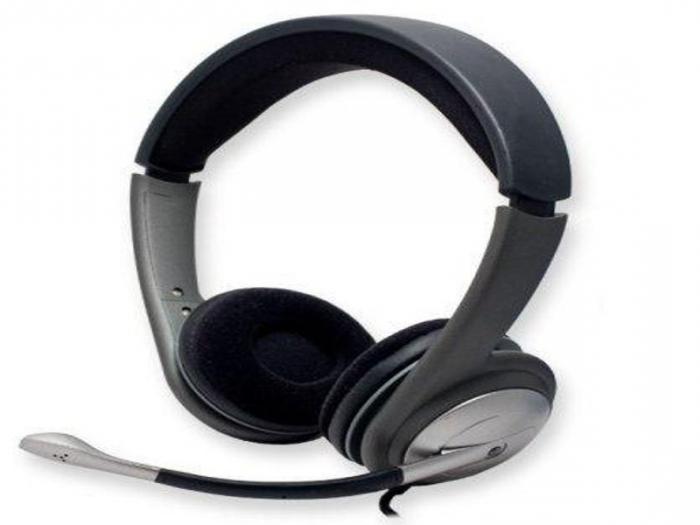
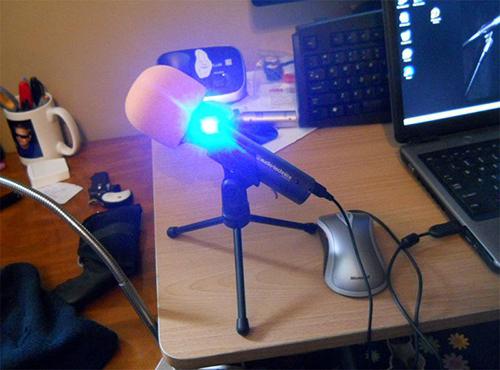
We configure an external microphone
An external microphone can be connected to a computer or laptop, and this can be done without great difficulty. Use the jack near the headphone jack to plug in the microphone cord.
To configure the microphone, do the following:
- Open the control panel (as we did in Windows 10, we described it a little higher) and go to the “Hardware and Sound” section.
- Go to the sub-item, which we denoted in the screenshot red frame.
- Now open “Record”, see our microphone here and click on its name with the right key of the manipulator. We need the entry "Properties."

- Go to the "Levels" tab. Here you can increase the volume of the microphone or, conversely, reduce it. By sampling, determine the level comfortable for you and apply the changes with the “OK” key.
- In order to check how well the microphone works, we will not use pre-listening, and for a change we will use the visual indicator. Just close the microphone properties and go back one step. Next, start talking, and the indicator highlighted in the screenshot will display the volume level.
Adjust the device so that during the conversation the bar reaches the top value, but does not rest on the last division. This will be the most comfortable level of sensitivity of the microphone.
If the PC does not see the microphone, try updating the driver using the method described above, or check the integrity of the device cable and plug.
We remove the noise when working with a microphone
Often when working with a microphone, the user discovers that his interlocutors hear a strong noise or background. Below we will figure out how to fix it, but first we will learn how to check the microphone on Windows 10, to make sure that the problem is on our side.
Do the following:
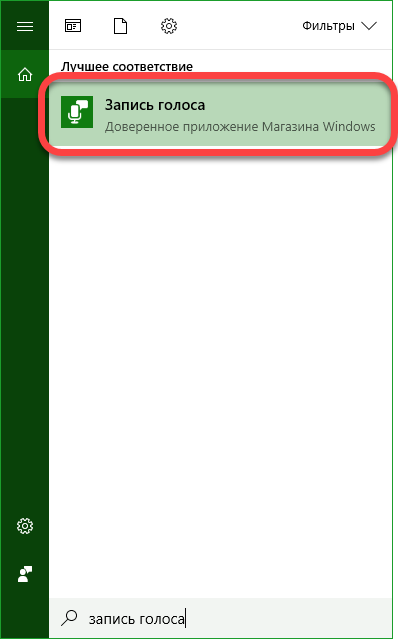
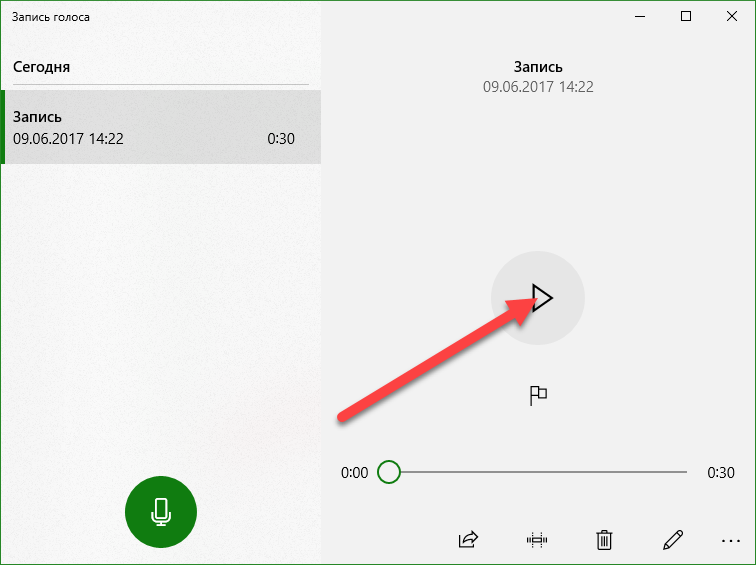
- Open the standard voice recording system tool. To do this, enter the necessary query in the OS search box and click on the result that appears.
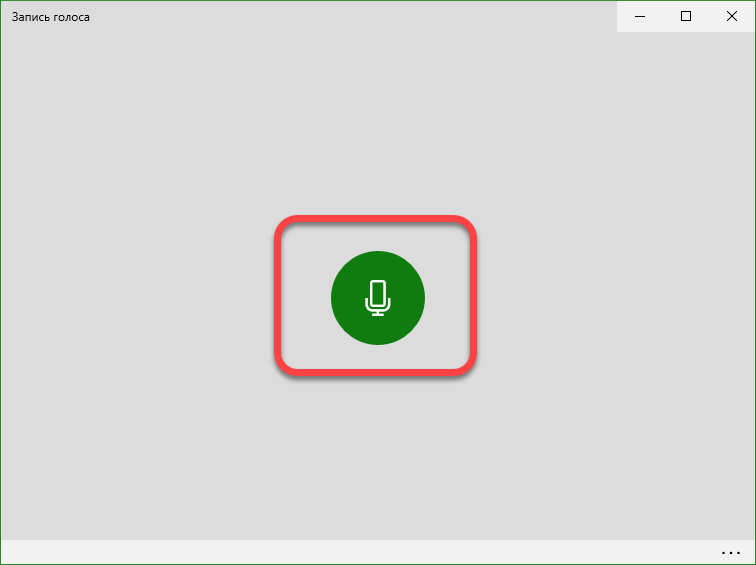
- In order to determine whether your microphone is fonet or noise is manifested due to problems on the interlocutor's side, we will record a test segment, during which you will pronounce different phrases. Click the "Record" button.
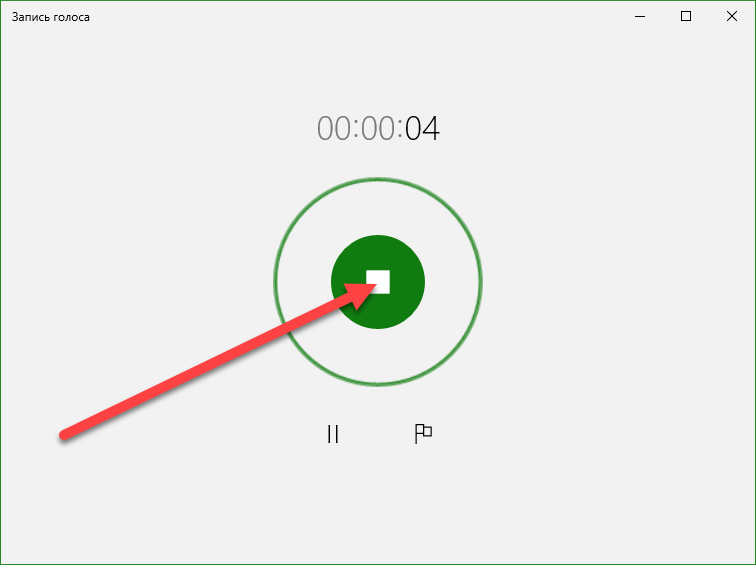
- When the necessary words are dictated, click on the icon to complete the recording.
- Go to the audition.
- If everything is in order, and you do not hear any noise, then the background is caused by problems in the speaker's speaker system, but if you hear interference, you need to reduce the sensitivity of the microphone. To do this, run the properties of the sound icon in the system tray and go to the properties of the microphone. There, using the sliders, we reduce the sensitivity of the device and again carry out a test with a sound recording. We do this until the background disappears and the sound is heard well. If the voice is low, try increasing the sensitivity.
Now you know what to do if the microphone does not work on a laptop or a PC with Windows 10, but if you have any comments or questions in the process, write them to us in the comments, and we will respond as soon as possible.
The built-in microphone is an indispensable element of almost any modern laptop. If before the owners portable computers I had to buy a microphone separately, connect it to a laptop, adjust the sound, but now it is not necessary to do this. If your device already has a microphone, it remains only to figure out how to configure it. On all laptop models, the microphone is configured the same way. Minor discrepancies may be associated with different operating systems.
Check the presence of a microphone
How to set up a microphone on a laptop? First you need to carefully read the instructions for your equipment and make sure that the built-in microphone really is.
If there is no instruction, use the device manager, where you can also find out about the presence of a built-in microphone. To do this, you must perform the following combination: start-up - control panel - sound - recording. If the laptop has a built-in microphone, then in the menu that opens, you will see this device. If it still does not, then you have to buy an external microphone.
We adjusted the built-in microphone
To configure the built-in microphone on a laptop with Windows XP operating system, first of all, check whether the driver is installed on the sound card. If the system was installed recently, then it is quite possible that the sound drivers still simply did not have time to install. They can be installed from the disk that comes with the laptop, or simply downloaded from the Internet.
If the drivers are, and the microphone still does not work, try to make an update. Click the "Start" button and then "Control Panel", where you will open the tabs in the following sequence: sounds - audio devices - sound recording. Now you need to set the device to be used by default. Then decide on the volume and click the "Advanced" button.
Next, a window will appear where you will first need to select “Parameters” and then “Properties”. Put a tick next to the line “Microphone” and confirm your actions with the “OK” button. After that, a knob should appear that can be adjusted to any volume level. On laptops with other operating systems (Windows7, Windows8 or Windows vista ) The setup procedure is almost the same. The only difference is that after you enter the Control Panel, the tabs need to be opened in the following sequence: sound - record - microphone - properties: microphone - levels.
We adjust the microphone in Skype
For the microphone to work correctly, you need to install special utilities in separate programs. They can be easily found and downloaded on the Internet. There are utilities that remove echo or suppress noise. Others allow you to set the most convenient distance from the user to the microphone.
Despite the fact that all previous settings are set correctly, a number of users face similar problems in Skype. For example, the interlocutor is not heard, or vice versa - the interlocutor does not hear you.
To set up the microphone in Skype, you need to open the following tabs: tools - settings - sound settings. In the "Microphone" column, select the default device. After that, when talking in the column "Volume" a green bar will appear. Check the box next to “Allow auto tuning microphone. " After that, the sound will become louder or quieter as needed. Details on how to establish a connection in Skype, is in the article -.
If all of the listed methods did not help to set up the microphone, perhaps other methods that you will learn from our instructions will help you. Also useful information on this issue can be found in the article. Well, if the microphone works, but the volume is not enough, refer to the article - How to increase the microphone volume.
In modern laptops there is a built-in microphone. This is actually a very convenient device! You do not have to make a complex microphone connection to a laptop, as you need to do on personal computers . For a PC, there are models of external microphones, it can be a headset or a simple microphone, respectively, it needs to be connected to a computer, set up, and then checked.
All of the above procedures can be spent. a large number of time but since as mobile computers There is a built-in microphone, everything is made much easier. Today you will learn how to set up a microphone on a laptop. Consider a few simple methods.
Support
Before setting up the microphone, you will definitely need to know if this component is present on your device. Of course, nowadays almost all modern laptops are equipped with a microphone, but we recommend that you still make sure that there is a microphone on yours. In order to do this, you just need to get the documentation from your device, carefully read it.
If there are no documents on hand, then you can find out about the presence of a microphone in another way. All you need to do is go to the “Device Manager” menu. You can also check if there is a microphone or not via the Control Panel.
If you are already in this folder, you should find the category “Sound”, and in the new window that opens, select “Record”. In the menu that opens, you can find information on whether you have a built-in microphone or not. If it is, then it will be displayed in the menu.
If the microphone on the laptop does not work for you, then most likely the drivers are installed incorrectly on it. Or on the device they are not at all.
Selection
 So, if you find in the menu that you have more than one device displayed at once, then you should determine which device is a microphone. Understanding which device is a microphone is easy! To do this, simply knock on the case where the microphone output is located.
Where the device icon is installed, you will notice green bars. While knocking on this icon, you will see fluctuations. So we decided - it is this device that we will need! Let's go further.
Instruction
 Now let's get to the most basic question - how to set up a microphone on a laptop.
If you have installed operating system “Windows XP”, then you need to start the configuration by checking the drivers for the sound card. It also happens when the drivers are installed, but the microphone still does not want to work. In this case, you may need to reinstall the drivers, or you will need to look for the problem elsewhere.
You can download the driver for the microphone on the laptop on the manufacturer's official website, and if you have a disc that came with your laptop, then we recommend using it.
If the drivers that were installed from the disk still do not allow the microphone to work, then most likely they will need to be updated. You will need to go to the “Control Panel” menu through the “Start” menu, then find the “Sounds and Audio Devices” tab.
In the "Audio" tab, select the audio recording function, then install the device, which is the microphone. Now go to the "Volume" and there select the tab "Advanced". Now we open a new window by clicking the “Parameters” link, then we select “Properties”. After performing these procedures, you will notice the inscription "Microphone", where you will need to check, after which you must save the settings.
Options
When all the above settings are set, you can see the volume slider. Now you need to make its own settings. If you did everything right, then the question of how to set up a microphone on a laptop will be resolved. As you can see, there is nothing complicated in this; the main thing is to do everything in stages. Differences in the settings may be in different operating systems, but in fact they differ slightly.
Conclusion
 It is important to know that if you plan on using additional programs to work with a microphone (for example, it may be Skype), then you will also need to make additional settings already in the program itself.
Accordingly, in each program, the settings may be different. In order to do everything right, the easiest way is to go to the "Instructions" or "Help" section and follow the prompts.
Now you know how to set up a microphone on a laptop. Even if you have a different operating system, you can make settings according to the instructions we recorded or simply use specialized programs for working with a microphone.
As part of the functionality of Windows 10, setting up a microphone (both external and built-in) is easy. Enough to carefully study the instructions and you can get a full-fledged working microphone.
Enable integrated microphone
Enabling the built-in microphone on a laptop with Windows 10 is as follows:
Device setup
Initially, you need to check whether the driver for the microphone is installed in the system.
For this, the following set of operations are performed:
If everything is done correctly, a green circle appears on the microphone icon, with a corresponding daw.
Enable and configure portable device
You can easily connect a microphone to a laptop in the appropriate slot (one for the microphone, the second for headphones). If you do not hear anything from the sound device after connecting, you should check the socket on / off.
The following actions should be performed:
How to remove noise?
Before removing annoying noises in the microphone, it is necessary to check the device and detect its weak points.